Give bats a helping hand
Bats like to roost in old hollow trees but unfortunately there are fewer of these around in today’s shrinking woodlands, tidy parks and neat gardens - therefore, there are fewer bats! So get busy in autumn making bat boxes and by summer you can provide much needed homes for homeless bats!

Download your guide to helping bats
Bats are stars of the night, seen swooping through the night sky in the pursuit of their prey. Little understood, just what is the truth about these enigmatic mammals?
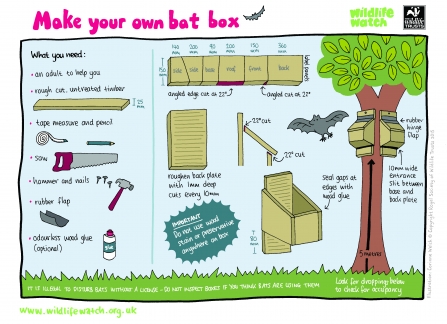
How to build a bat box
Follow these simple steps to build your very own bat box...
You will need...
- Rough cut, unplaned, untreated softwood timber, 150mm wide x 1500mm long x 25mm thick
- Scrap rubber, such as an old inner tube from a tyre
- Galvanised 40mm or 45mm nails
- Carpentry saw
- Hammer
- Pencil and ruler
- Scissors for cutting rubber
Marking out
- Mark out the panels of the box with pencil and ruler to the dimensions shown.
- Write the name of each panel onto the marked out wood (trust us, this will save confusion later).
- Where possible, try to ensure that the grain will run vertically in the finished box - this will help drainage.
Top tip.
For noctule bats - Increase the height of the sides to 240mm/ 300mm, height of the front to 240mm, and the length of the back plate to 460mm.
Cutting
Saw the panels apart. Note that you will need to make a slanted cut between the front panel and roof, at a 22 ° angle.
Roughing up
If the timber has been planed or is very smooth, saw 1mm deep cuts into the back plate at 10mm intervals. Don’t forget - no wood treatments or preservatives should be used on your box. These can be fatal to bats.
Nailing
- Start by nailing the sides onto the back plate. The sides are fixed outside the width of the back plate, nailed onto the 25mm thickness of the timber. Position the sides 80mm up from the bottom of the back plate so that there is a ’tailgate’ of this length protruding below the level of the box.
- Nail the floor panel onto the side panels so that it is flush with these at the front. There should now be an entrance slit at the bottom of the box between the floor panel and back plate.
- The entrance slit should be 10mm wide (no wider than 15mm) and run the width of the box.
- Nail all the other panels into place except for the roof panel.
Add the roof
Fix on the roof panel with a rubber flap ’hinge’ made from scrap rubber. This should cover the join between roof and back plate completely so as to be waterproof. Nail the rubber into the back plate first, then pull tightly over the join and nail it onto the roof. The roof should be able to lift away like a lid.
Where to put your box
Bat boxes should be positioned at least 3 metres above the ground (5 metres for noctules) in a position that receives some direct sun for part of the day, with a clear flight path to the box, but preferably also with some tree cover nearby as protection from the wind. In the roof eaves, on a wall or fixed to a tree are all suitable sites.
Dropping in
To see if your bat box is in use without disturbing the occupants, check the ground below the box for droppings.
Our handy guide


